Last week at work I was working on setting up a GraphQL server and wanted to deploy it. Since Continuos Integration and Continous Deployment are an intrinsic piece of every software’s workflow, it’s also the most complex part that developers hesitate to understand and run away from. So to bridge this gap I decided to have a smooth developer experience in terms of the following:
- Everything should remain in the context of GitHub.
- No overhead of setup cost of third party CI services(secrets, authorization, security, infrastructure). Everything should be in the context of GitHub since it holds all the necessary information required WRT to our source code.
- Remove the overhead and dependency on DevOps. Afterall you’re the developer you should take care of everything WRT to your code because DevOps=Developer+Operations.
- As a developer I just wanted a single place to look for everything in the context of a particular project - Source code, PRs, issues, Builds, tests, deployments and everything in between to avoid navigating to multiple places/tools just to check why the hell did my PR checks fail, why did my code not deploy, which commit did my CI service pick up.
Being heavy users of GitHub I couldn’t wait to get my hands into GitHub actions and experiment if it could be a good fit for the wishlist I had above. And literally it outshined and checked off all the items on my list. ✅
In this post I’ll demonstrate how to setup GitHub actions in real for production-grade applications along with few of my hiccups and how I solved them on the way. I’ll take an example of deploying a simple nodejs express server. This is the GitHub repo I created for this demonstration.
But first things first, what is GitHub Action? 🤔
GitHub Actions makes it easy to automate all your software workflows, with world-class CI/CD. Build, test, and deploy your code right from GitHub. Make code reviews, branch management, and issue triaging work the way you want. — from GitHub’s website
In plain words GitHub actions provides you the infrastructure like any other CI/CD tool out there to automate the build and deployment process of your application. GitHub calls them workflows. Workflows gives you the complete flexibility to configure and structure your build and deployment process the way you want it.
Okay, now what is CI/CD? 🤷🏻♂️
- CI(Continous Integration) - Continuous Integration is a process that enables developers to frequently integrate their code into the main branch of a common repository. To do so we leverage tools to run checks(Build, Lint, Test etc.) whenever a PR is raised. If the checks passed you become confident that it’s safe to merge the code and it won’t break anything in the existing codebase.
- CD(Continous Delivery) - Continuous delivery is actually an extension of CI, in which the process is automated further to enable easy and confident deployments into production — at any time. A mature continuous delivery process exhibits a codebase that is always deployable — on the spot.
What I was aiming for? 🎯
Every application has a lifecycle, starting from code review to merge to deployment. Similarly I first figured out the lifecycle of my application and then set the list of tasks that I wanted to achieve through GitHub actions. Typically these tasks becomes your workflows. Here’s what I was aiming for:
- Run the Validations i.e Linters, Tests and Builds on every PR and every code push.
- The builds for different environments(staging, production) should be auto-triggered based on some criterias. This will build the application and docker image and push to docker registry(GitHub package registry)
- The deployment for different environments(staging, production) should be triggered manually via some external action. This will deploy to the servers.The reason for manual deployment was obvious it should be a cautious action by a human and should be controlled. For example sometimes you want production deployments to be triggered during certain time slots of the day.
To break it further I asked certain questions to myself:
Q1. What are different environments I want my app to be deployed in?
- Staging
- Production
Q2. What are different events or criterias that trigger workflows?
- Pull Requests
- Push to release/* branches for staging
- Push to master branch for production
Q3. What are different different workflows I should create?
- Validate
- Build
- Deploy
Now the next step was to create a map of environments:events:workflows
| Environment | Events | Workflows |
| * | PRs and every code push | Validate |
| Staging | Push to release/* branches | Build |
| Production | Push to master branch | Build |
| Staging | Manual trigger Deployment event | Deploy |
| Production | Manual trigger Deployment event | Deploy |
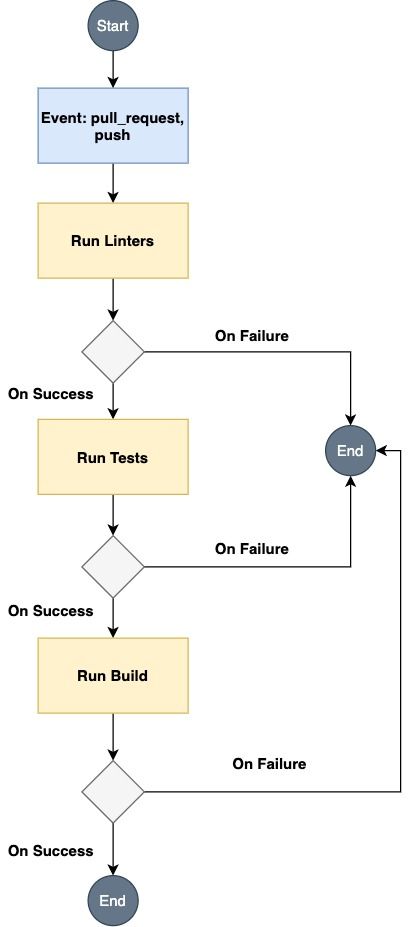
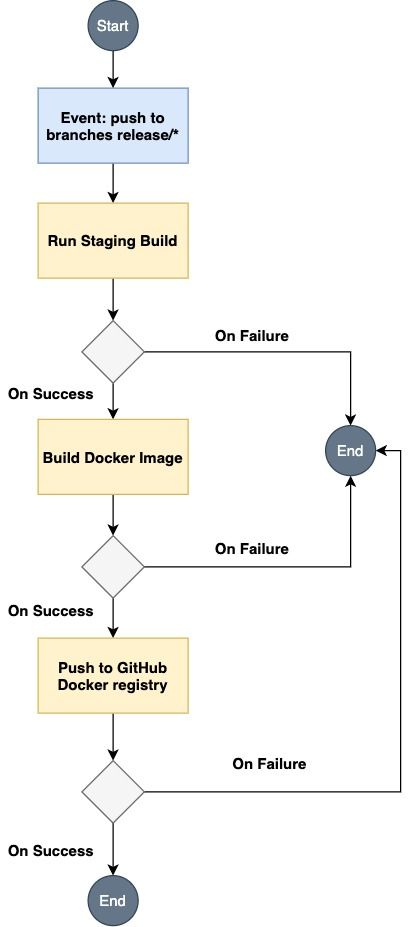
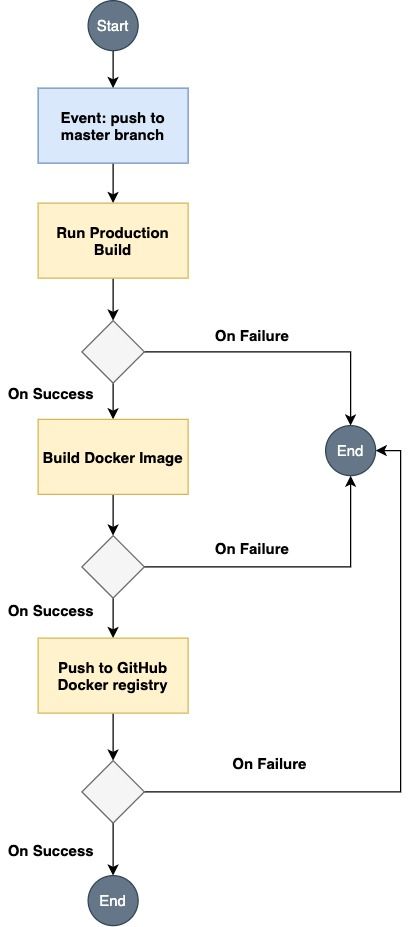
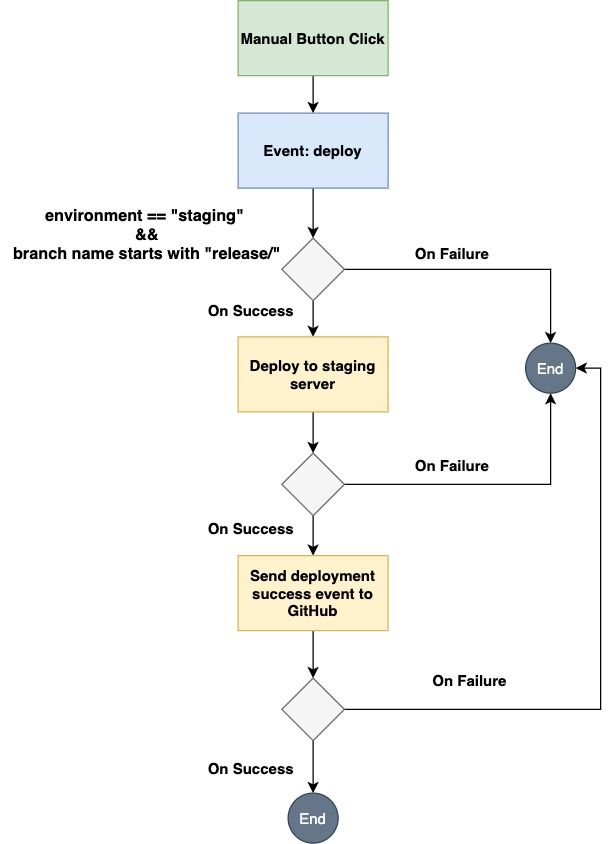
Now let me help you visualise the workflows above with some diagrams
Workflow - Validate
Workflow - Build - Staging
Workflow - Build - Production
Workflow - Deploy - Staging
Workflow - Deploy - Production
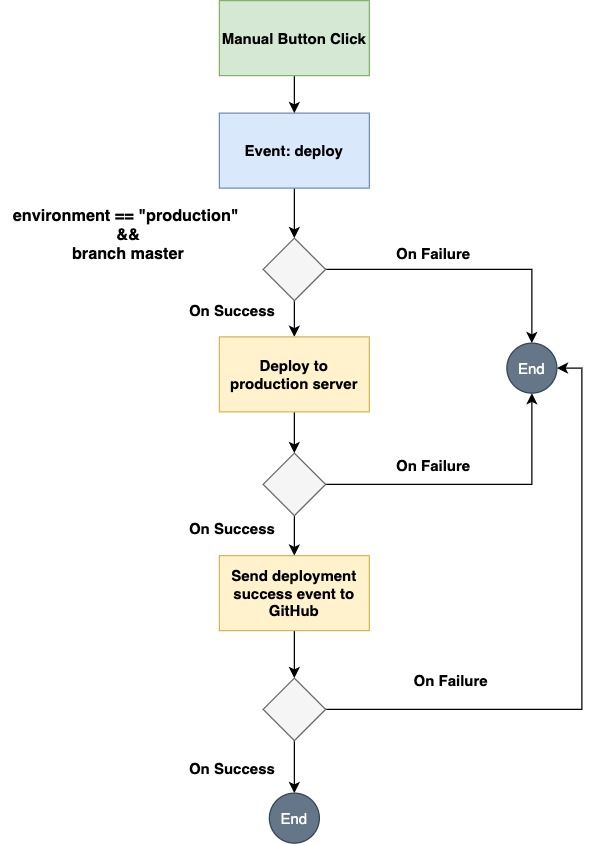
Let’s implement each one of these workflows 👨💻
- First fork this repo in your account and add following secrets to your cloned GitHub repo by clicking on the
Settingstab on GitHub:
1DOCKER_HUB_USERNAME: your_github_username
- Then clone the repo on your local
1git clone git@github.com:<your_user_name>/rabbit-hole-github-actions.git23# Install dependencies4yarn56# To start the app, run the following command and navigate to http://localhost:88887yarn start
- Next, remove the workflows directory since we’ll be creating them here step by step
1rm -rf .github/workflows
- Now create workflows directory
1mkdir .github2mkdir .github/workflows
Now you have the repo set. Let’s start creating our workflows one by one.
Implement Workflow - Validate
- This workflow should run on all the PRs and every code push
- Create
validate.ymlfile under.github/workflows
1name: Validate # name of the workflow. This will be displayed everywhere23on: [pull_request, push] # tells github actions to run these on all PRs and push events45jobs:6 validate:7 name: Validate Source Code # name of the job8 runs-on: ubuntu-latest9 steps:10 - name: Checkout Codebase11 uses: actions/checkout@v212 - name: Use Node v1213 uses: actions/setup-node@v114 with:15 node-version: 1216 - name: Install Dependencies17 run: yarn --frozen-lockfile18 - name: Lint Source Code19 run: yarn lint20 - name: Run Tests21 run: yarn test22 - name: Build Application23 run: yarn production:build
- That’s it! Run the following command and push it to GitHub
1git checkout -b feat/demo-validate-workflow
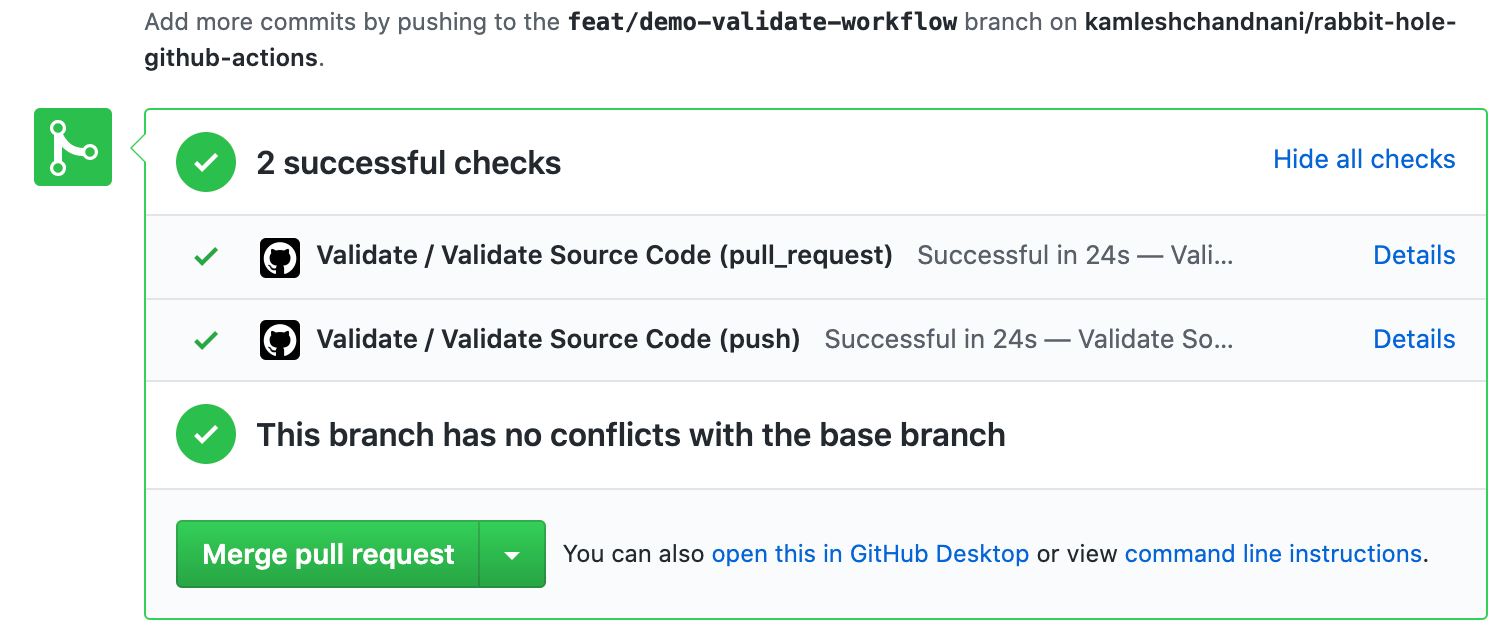
- Once pushed you’ll be able to see the checks running on your PR. This is how our checks will look like. You can check it on GitHub as well
Implement Workflow - Build - Staging
- This workflow should run whenever we do a push on
release/*branches. This is the assumption I’ve made that myrelease/*branches map to staging environment. You can keep any pattern you want. - This workflow will build our application, create a docker image and push it to GitHub’s docker package registry
- Create
staging-build.ymlfile under.github/workflowsand copy-paste the following
1name: Staging Build # name of the workflow. This will be displayed everywhere23on:4 push:5 branches: [release/*] # tells github actions to run when there's a push on release/* branches. It supports wildcard characters67jobs:8 build:9 name: Build10 runs-on: ubuntu-latest11 env: # this is where you define you environment variables to use for the job12 DOCKER_HUB_USERNAME: ${{ secrets.DOCKER_HUB_USERNAME }}13 DOCKER_HUB_REGISTRY: docker.pkg.github.com14 APP_NAME: ${{ secrets.DOCKER_HUB_USERNAME }}/rabbit-hole-github-actions/github-actions-staging15 VERSION: ${{ github.sha }}16 steps:17 - name: Checkout Codebase18 uses: actions/checkout@v219 - name: Use Node v1220 uses: actions/setup-node@v121 with:22 node-version: 1223 - name: Install Dependencies24 run: yarn --frozen-lockfile25 - name: Run Tests26 run: yarn test27 - name: Build Application28 run: yarn staging:build29 - name: Build Docker Image30 run: | # we are creating a docker image out of our Dockerfile31 docker build . \32 --file ./Dockerfile \33 --build-arg STAGE=staging \34 --tag ${DOCKER_HUB_REGISTRY}/${APP_NAME}:${VERSION}35 - name: Push to Docker Hub36 run: | # push the dockerfile to github package registry with staging tag37 docker login ${DOCKER_HUB_REGISTRY} --username ${DOCKER_HUB_USERNAME} --password ${{ secrets.GITHUB_TOKEN }}38 docker push ${DOCKER_HUB_REGISTRY}/${APP_NAME}:${VERSION}
- That’s it! Run the following command and push it to GitHub
1git checkout -b release/demo-staging-build-workflow
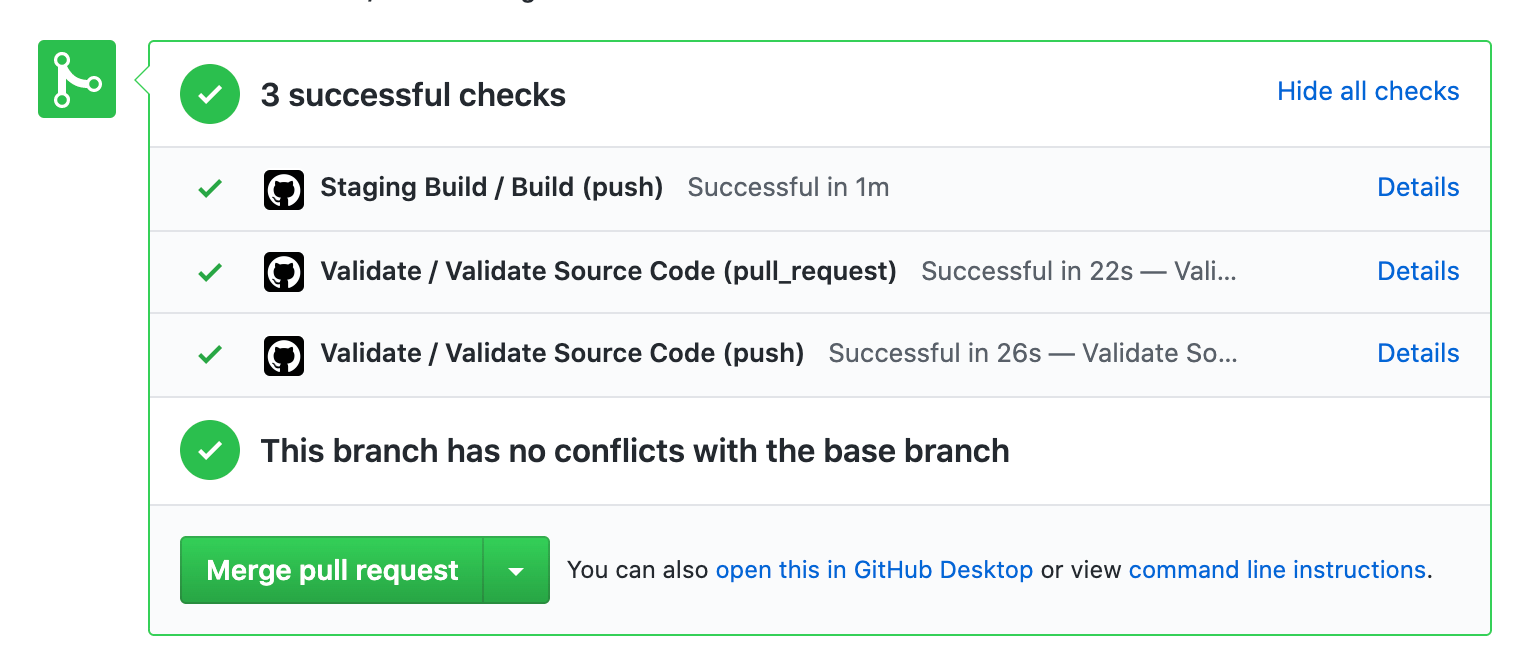
- Once pushed we’ll see the checks running against our PR. This is how our checks will look like. Notice it ran
validatebecause it’s a push + PR and also since we pushed this torelease/demo-staging-build-workflowbranch it’ll also trigger thestaging-buildworkflow which will build our app with docker and push the image to docker registry. You can check it on GitHub as well
- Once the workflow is complete, you’ll see our docker image under
rabbit-hole-github-actions/packageson GitHub

Implement Workflow - Build - Production
- The production build is similar to staging. The only difference is this workflow will only run whenever there’s any push to master.
- Create
production-build.ymlfile under.github/workflowsand copy-paste the following
1name: Production Build # name of the workflow. This will be displayed everywhere23on:4 push:5 branches: [master] # tells github actions to run when there's a push on master branch67# everything below this remains same as staging. Skipping to avoid the unnecessary clutter
- Once the workflow is complete, you’ll see our docker image under
rabbit-hole-github-actions/packageson GitHub

Implement Workflow - Deploy - Staging
- This workflow should run whenever we manually trigger an external event for deployment on
release/*branches. - This is the trickiest part of GitHub actions. GitHub actions doesn’t allows a way to trigger an action from outside GitHub. It does provide an event
repository_dispatchwhich we can use in theonproperty of our workflows but it only works on master branch. There’s no way to trigger this event for a particular branch. - Now this came to me as a surprise since all my assumptions went for a toss. How will I trigger a deployment for my custom branches? I searched a lot of examples, documentations but nothing helped. But, then it made me think what is deployment? It’s basically an event that should be triggered like
pull_request,pushetc. GitHub actions run on variety of events, you can find the whole list here. - One thing that clicked me was that GitHub do support webhooks for variety of use cases and events. That’s how all the GitHub apps are being built. And then I came across this webhook called
deploymentand it was an Ahaa! moment for me becuase that’s exactly what I was looking for. - Create
staging-deploy.ymlfile under.github/workflowsand copy-paste this
1name: Staging Deploy23on: deployment45jobs:6 deploy:7 name: Deploy8 runs-on: ubuntu-latest9 if: github.event.deployment.environment == 'staging' && startsWith(github.ref, 'refs/heads/release/') #condition to check whetehr the event was for staging deploy else skip the workflow if the condition fails10 steps:11 - name: Checkout Codebase12 uses: actions/checkout@v213 - name: Use Node v1214 uses: actions/setup-node@v115 with:16 node-version: 1217 - name: Install Dependencies18 run: yarn --frozen-lockfile19 - name: Test20 run: yarn test21 - name: Build22 run: yarn staging:build23 - name: Deploy to Kubernetes Cluster24 run: echo ${{ github.ref }} ${{ github.event.deployment.environment }} ${{ github.event.deployment.id }}25 - name: Mark Deployment Success on GitHub26 run: | # mark the status as "success" back on GitHub27 curl --location --request POST 'https://api.github.com/repos/kamleshchandnani/rabbit-hole-github-actions/deployments/${{ github.event.deployment.id }}/statuses' \28 --header 'Authorization: token ${{ github.token }}' \29 --header 'Accept: application/vnd.github.everest-preview+json' \30 --header 'Content-Type: application/json' \31 --data-raw '{32 "environment": "staging",33 "state": "success"34 }'
- So the way it will work is you need we need to trigger this webhook either via some external CD tool or we can do it via simple
cURLas well. For simplicity I’ll usecURLhere. This is how the call looks like
1curl --location --request POST 'https://api.github.com/repos/kamleshchandnani/rabbit-hole-github-actions/deployments' \2--header 'Authorization: token your_personal_access_token' \3--header 'Accept: application/vnd.github.everest-preview+json' \4--header 'Content-Type: application/json' \5--data-raw '{6 "ref": "release/demo-staging-build-workflow",7 "environment":"staging",8 "description": "Deploy request from external"9}'
- This
cURLtriggers the deployment event withref: "release/demo-staging-build-workflow"which is our branch name andenvironment: "staging". When it reaches our workflow it’ll be checked against this condition
1if: github.event.deployment.environment == 'staging' && startsWith(github.ref, 'refs/heads/release/')
since it’ll pass this check our deployment will happen. GitHub will add the deployment pending tag to our PR

- The next step is since we manually triggered this event we need to notify GitHub once our deployment is done and you’ll see that in
staging-deploy.ymlatLine: 27we run another curl command that marks our deployment assuccess
1curl --location --request POST 'https://api.github.com/repos/kamleshchandnani/rabbit-hole-github-actions/deployments/${{ github.event.deployment.id }}/statuses' \2--header 'Authorization: token ${{ github.token }}' \3--header 'Accept: application/vnd.github.everest-preview+json' \4--header 'Content-Type: application/json' \5--data-raw '{6 "environment": "staging",7 "state": "success"8}'
- Once the above curl request will run. You can see that our deployment will be marked as successfull in our PR.

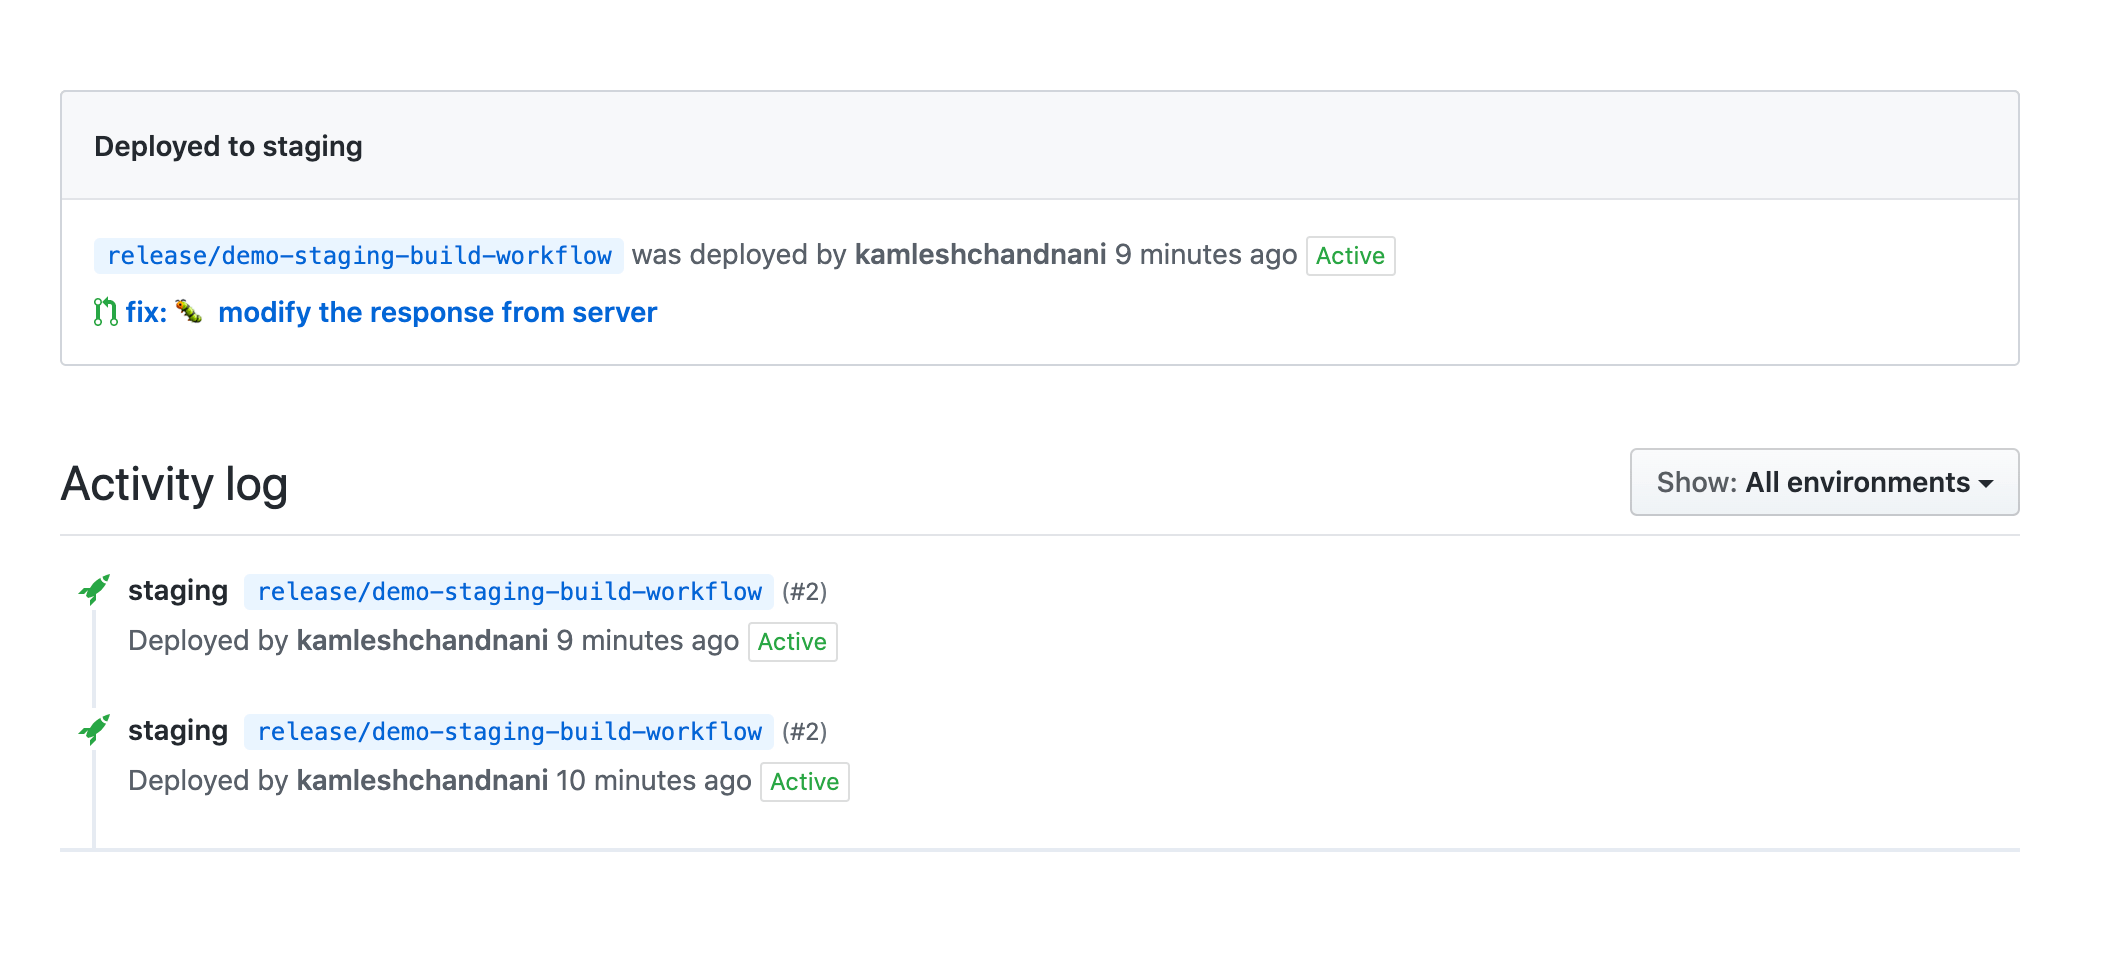
- This is exactly what we expect from deployment. You can see all the deployments environment wise on GitHub under environemnts tab.
Implement Workflow - Deploy - Production
- This workflow should run whenever we manually trigger an external event for deployment on
masterbranch. - Again everything remains same as staging deployment. But the only thing that changes is the condition and the event payload where we’ll send
environment: productioninstead ofstaging. - Create
production-deploy.ymlfile under.github/workflowsand copy-paste the following
1name: Production Deploy23on: deployment45jobs:6 deploy:7 name: Deploy8 runs-on: ubuntu-latest9 if: github.event.deployment.environment == 'production' && github.ref == 'refs/heads/master' # only this condition changes1011# rest of the contents of the file is same as staging-deploy.
Wrap Up 📝
- The matrix environemnt:events:workflows we created earlier is now implemented in real. Even though I had few hiccups since everything was not documented staright forward and I had to do couple of experiments and reading to get it to this state. Go check this repo for full proof working example if you missed something on the way.
- This is the superpower GitHub Actions actions provide you with it’s flexible configuration.You can create, tweak and control workflows as per your needs and requirements. Also, GitHub has an amazing event based system, once you start understanding it you can make powerful tools on top of it.
- Now, finally I just look at a single place for everything in the context of a particular project - Source code, PRs, issues, Builds, tests, deployments and everything in between to avoid navigating to multiple places/tools just to check why the hell did my PR checks fail, why did my code not deploy, which commit did my CI service pick up. This experience is immense and saves a lot of time and avoids context switches of a developer navigating here and there for debugging the builds, deployments etc.
Phew! That was a roller coaster 🎢 ride. I hope you learnt something out of this. There’s a lot more that you can do with GitHub actions ⚡️
If you have built something with actions that helped you ease your process or you have ideas or thoughts around CI/CD practices and want to share your experiences/stories setting up the CI/CD processes for your company or side projects then you can write it to me or you can DM me on Twitter. I would love to hear them!
P.S. If you like this, make sure to subscribe, share this with your friends and follow me on twitter 😀